This blog is designed as a resource for CURR 501, Media Literacy, Popular Culture and Education at Rhode Island College, summer 2015. The course is driven by the essential question: How is new media and digital culture produced and consumed in ways that help us understand ourselves and each other in the context of the current educational landscape?

Thursday, July 9, 2015

COURSE EVALUATION


On Friday morning, you will spend about 30 minutes reflecting on your learning experience here.  You can CLICK HERE to access the Course Evaluation form.  Thank you for your honest feedback!

Presentation Schedule


CURR 501 2015 PRESENTATION SCHEDULE

Wednesday, July 8th
(1) 1:15-1:30  Brittany D
(2) 1:35-1:50  Dan
(3) 1:55-2:10  Brittany R
(4) 2:15-2:30  Tina
2:30-2:45  BREAK
(5) 3:00-3:15  Dalila
(6) 3:20-3:35  Alicia
(7) 3:40-3:55  Katie


Thursday, July 9th
(8) 12:15-12:30   Claudine
(9) 12:35-12:50  Laura
(10) 12:55-1:10  Taylor
(11) 1:15-1:30  Kara
1:30-1:45  BREAK
(12) 2:00-2:15  Brianna
(13) 2:20-2:35  Regina
(14) 2:40-2:55  Bryana


Wednesday, July 8, 2015


What role do teachers play in learning?  Check out Sugata Mitra's vision of a School in the Cloud that he articulates in his 2013 Ted Prize Wish.


Compare his vision to that of Ken Robinson, below.


Ken Robinson, Education's Death Valley
"Sir Ken Robinson outlines 3 principles crucial for the human mind to flourish — and how current education culture works against them. In a funny, stirring talk he tells us how to get out of the educational "death valley" we now face, and how to nurture our youngest generations with a climate of possibility."

3 Principles Guide Human Life in Flourishing
  • Diversity (as a strength to embrace) vs Conformity 
  • Curiosity (as the engine of achievement) vs Compliance 
  • Creativity (to allow flexibility and thinking outside the box) vs Standardization

He argues that the standardize testing landscape forgets about the relationship between "teaching" and "learning" as it deprofessionalizes teaching, and emphasizes control at the federal level. He makes a strong case for the importance of TEACHERS in awakening the the floor of the Educational Death Valley.

He believes that schools work when they:
  • Highly personalized
  • Strong teacher support
  • Tight links with community
  • Broad and diverse curriculum
  • Student involvement in and outside of school

Thursday, July 2, 2015

Gender Making....

Pictures forthcoming!

Super (She)ro Toolbox

Androgyny Game


This is a mirror I created for my friend Ellie for her third birthday.  The text reads:

"Once upon a time there was a princess named Elle.  She was STRONG, and SASSY, and BOLD.  She could

(Each envelop along the side names a different trait such as "Read every book ever written, run as fast as the wind, recognize beauty of all kinds, speak out loud and strong to change the world... etc)

With a BRAVE heart, and a  CURIOUS mind, and a KIND soul, (and sparkly shoes that are easy to run in,) the princess lived happily ever after. "

Notes on Kelly Reed


@Kellyjvreed

All of the resources Kelly talked about:
Bit.ly/letsmakestuff


It's not really about the TECHNOLOGY:
"Used purposefully, technology/media has the potential to help students "reposition themselves, from cogs in the machine to social actors intent on jamming, resisting, and/or rewriting the status quo" "(Marshall and Sensoy, Rethinking Popular Culture and Media 11).  

Sometimes we confuse compliance with engagement


20% Time Projects

http://www.20timeineducation.com/

http://www.20time.org/


Meet TED's Ed!

These days TED talks are my adult version of a bedtime story. I set up my iPad, pick something cool, press play, and rest my head on my pillow. For this reason I was happy to see what else TED had to offer. I shook up my usual consumerism routine and spent some time exploring what TED Ed had to offer as a producer.

EXPLORE TED Ed here     

What is TED Ed?

It is a platform designed for teachers and students to create lessons or view lessons using the TED talk videos or YouTube videos.

How can I use it?

Ted Ed is FREE! Part of its mission is to expand and teach/reach as many people as possible. They are working furiously to continue to grow this tool.

What was my process creating a lesson?

  1. I created an account (very simple! took only 2 minutes!)

  • Username

  • Password

  • Teacher or student

  • Verify through email notification


  1. Follow the 4 category template/steps TedEd offers


  • Watch

    choose a video from TED's complete video library or YouTube that becomes the basis of your lesson (there is a text bar if you choose to title your lesson or provide context; it allows up to 500 characters).

  • Think

    there is a blank text box where you can write up to 15 questions

  • Dig Deeper

    this is another text box with space for links to other resources, more questions, pictures, attachments, font options, etc…

  • And Finally...

    another text box to leave your students with some "final thoughts" about the lesson; it also allows for links, attachments, font options


  1. Play with the 3 options

  • Edit – I did this several times while writing questions. It worked well and saves automatically!

  • Publish – I did not do this b/c I am not ready for it!

  • Preview – I tried this several times, but nothing happens…L


Feel free to check out my lesson   here…

What else does TED Ed offer?

  • Access to 127, 874 other teacher created lessons.

  • A discussion section where people can "discuss" your lesson in the form of posted comments.

  • Hope for more from Ted Ed.

How would / could I use this tool?  

  • mini – lessons to provide overview or context to a concept or idea

  • to ask students to "talk" and respond to each other about a an idea presented in the video

  • share it as a resource for students to access if they are not at school but would like clarification on a topic/concept – there may be answers/lessons on the site

How was it creating the lesson?

Simple!  It was very easy and user friendly!  It is hard to say exactly how it would play out in a classroom until I try it, but there is a place for handouts (attached to the text boxes), and big ideas could be presented for students to indulge in.

What are the shortcomings of using this?

It might be difficult to include or plan for smaller activities within the current template framework – although it could be done if space is used judiciously in the text boxes.

For those teachers expected to follow the Gradual Release model or a scripted curriculum, it might not be worth the time to fit that model into the space provided in TED Ed.

This forum is great for students with access to technology so they can explore the links and what the site has to offer.


Sparkol/VideoScribe

While the title of the site is Sparkol the actual application name is VideoScribe.  

http://www.sparkol.com/   which links to   http://www.videoscribe.co/home?utm_expid=32326862-6.v6po904TQjGqE1B9uwJHDA.1


I was attracted to this application because I've seen Robert Reich use something like this in his many videos on the economy and social justice.  (Since "his hand" is not animated I can't be sure of this.)  


VideoScribe allows users to have animations of images being draw, text and voice to all become synthesized onscreen in a narrative form.  


I registered for the seven day trial version and it was a quick to download to my laptop.   

A tutorial flashes on the screen at first run of the application.   It can be shown at every launch of the program.   It moves very quickly but not to worry, there are basically only three main icons to click on at the start page.   The icons on this page and the actual construction page are all very simple and readily identifiable.   The program froze on my screen a few times, quite possibly because the library of images needed to become accessible to me.


In the course of a minute or two after some initial freezing of the screen I easily added three elements to my first presentation.    I could see the draft in progress with a handy playback feature that loaded very quickly. 

It was fun to use and the playback feature as it made it clear exactly how the presentation would be and therefore it clued me into how I would want to adjust layout or voice timing.  

I wanted to make a presentation on the nature of the fruit in the Garden of Eden, usually misnamed an apple.  Or is it misnamed?   The fruit referenced in Genesis was likely an etrog, a type of citrus.  The etrog's name in certain countries is the Persian Apple.  I thought I could use more terms than just an apple but could not find many complex terms after finding the apple.  I looked for Middle East, Mesopotamia, Tigris River, and got no results.   "Iraq" gave me a map of all of Asia or pretty much all of the Eastern Hemisphere to choose from.  When I searched for Adam I got a two Michaelangelo stick figure images but they were premium images I would need to upgrade to use.   


Removing items, such as voice-over was as easy inserting it into the project.   


In light of what I've shared I give it at least an 8/10 for ease of use. 

As for affordance, I think it could fit in well with David Lazear's lesson plan format that always begins with an awakening activity that creates a sense of wonder or interest in a student's mind.  I also speculate that it could also be used by students to identify their own learning preferences and styles by the way they might construct a short presentation on their own.  I think the tool has the has the capacity to adapt to the concrete-sequential, abstract sequential, concrete random and abstract random learning students exhibit.   After viewing a number of their colleagues work they could be guided to see these styles at work and help them to play to their own strengths and to develop learning styles that are underutilized or undeveloped.      I'd have to revisit the prices on the version page to discern if I'd like to invest in this tool.

StoryMap JS: Maps that Tell Stories


StoryMap JS is a free tool that allows teachers to create interactive, visual stories through interconnected points along a map. Users tell stories (through a series of slides) that move over multiple locations of the world. Each point on the map is explicitly linked to the next and viewers can clink on a specific location to gain more information about the topic. For example, students can click various points to view pictures, text, video clips, or social media links.


​​There are various examples on the StoryMap website to get an idea of how it works. I could see using this application in Social Studies as it allows students to visualize people, places, and ideas around the world. Students could also create their own visual summaries of historical events and themes (like the Oregon Trail, or the Trail of Tears). I decided to explore StoryMap using my recent trip to Mexico as a guide. Each slide would be a place I visited with a corresponding point on the map. Besides adding my own photos, I was going to add links for the viewer to gain a better understanding of the area. Overall, I found the ease of use similar to creating a Powerpoint presentation. Once I got used to it, I began to feel confident about adding more and more slides.

In order to use the application you need to sign into your Google account. (While I was creating one, I found it easier to save all the images I was going to use into my Google drive. It helped me stay organized and it didn't take up space on my computer.)

Step 1: Click on Make a StoryMap now. It will prompt you to sign into your Google account. Then you have to choose what type of story you want. [More on Gigapixel down below.] 


Step 2: The first slide you will make is your cover slide. When you begin to add more slides and locations, points will start to appear on your map summary.


​After I created the slide, it prompted me to chose a location on map. You can put a specific address or a city/town.  


StoryMap also has a a feature that allows users to create stories using one large photo instead. To help explain what I mean, here is an example:


Each point corresponds to an analysis of  a specific area in the painting. I found this somewhat harder to create since you have to know how to edit and resize the photograph a certain way. Here is a nice tutorial for those who are interested in creating one.


​ 


Prezi

Welcome to your quick Prezi tutorial. 


What is Prezi?
Sitting through powerpoint presentations over and over again can leave one feeling bored and inattentive.  Now, through the use of Prezi this feeling of boredom can be overcome.  With its 3D features and transitional screens, prezi captures the viewers attention with ease.  It's free, easy to use, and can be stored online!  Useful for teachers, students, and for anyone giving a presentation at any job field, this breakup of the monotonous powerpoint will help a presenter feel confident that their audience is engaged and entertained throughout. 


How to create a Prezi in 7 simple steps.

1. Click on the Prezi link
2. Sign up for Prezi (it's free)
3. Decide on a format for your presentation
4. Begin filling in your slides
5. Customize your slides by adding pictures, videos, and links using the "insert key on the top center of the screen"
6. Review and revise your prezi
7. You are ready to present!

Example: 

Ease of use:
There is a quick learning curve for this program, once the tabs are understood, and the features of the program become evident, it is very easy to use.  

Rating:


Teaching Value:
This tool is great for teachers and students to use.  It gives students a chance to collaborate on projects and create a professional presentation. It also gives teachers a chance to present information in a new way.

According to Prezi, here are the ways it is most useful in education:

Bring a Lesson to Life

Present a Timeline

Display Student Data

Introduce Yourself at Open House Night

Explore the Features of a New Classroom Tool

Share the Rubric for a Project

Present Writing Prompts


animoto


www.animoto.com

This program allows you to make a short video that includes slides with text, photos, and videos with background music of your choice.  

It provides you with a list of tools that you can utilize or you can download your own 


if your school had a budget for technology, you should take advantage.  

The cost for the year is about $ 60.00.  If you can share the cost with your colleagues, it will probably only cost you 10!   

🏡

I am new to all this technology and I was able to make a short video.  I still have to play around with the video so I can include my own photos and music.  I have to figure this out, but it was not too difficult.  
A help tool should be added to figure out how to insert videos or pictures.  
Would have been helpful.  
I'd give it a 4/5 since our world is surrounded by numbers!  


--
Dalila Torres 
5th Grade Spanish Teacher
International Charter School 

Google Site

Google Site


The digital tool I chose to explore is Google Site.  Google Site is a free and easy way to create WebPages. Because I am a new user of this sight, I can only rate it a 6 out of 10.  You can easily access Google Site by clicking the hyperlink above. It also offers a tutorial to help guide you.


Steps/Page 1:  You will need to log into Google Site using your google login and password

Inline image 1


Steps/Page 2:  Click the orange button to the left to create a new webpage.


Steps/Page 3:    Select a template you would like to use.  I selected classroom because I am going to build a class webpage.

·         Next you are going to name you Site.  Such as "Mrs. Richards Webpage" .  This will automatically create a site location "link" to your webpage.

·         Next you will select a theme for your page.  This will give you a the background to your webpage.

·         Click on the box so that the site you are not a robot.


Steps/Page 4:  This is your home page for the website. 

·         I clicked on the writing tool to edit the page.  This opened a box where I could type information and add images. 

·         Click save when you are finished.

·         You can add a page so that it will show up on your home page.


Screencastify

Welcome to the Screencastify tutorial! 

What is Screencastify?
Ever wonder how people videotape what is happening on their computer screen (like with Khan Academy)? Well, Screencastify is one way they might do it. Screencastify is a video capture app that can be added right to your Google Chrome browser. When you use it, it video records whatever is happening on your screen and can also capture audio narration. A major bonus of Screencastify is that it doesn't require any extra software and can be linked right to your Google account (and thus your YouTube account - which will come in handy if you want to edit and make your video public). The videos are all stored on the cloud, so they do not take up space on your computer and they can be accessed from any computer with an internet connection. However, if you would like to download a certain video to your computer, that can be done as well. Sharing is super easy as urls are automatically assigned. 

How does Screencastify work?
If you are a visual learner and would like a brief overview, you can watch this video tutorial

Then, for step-by-step instructions, follow along below:

1. Access the internet from your Google Chrome Browser. (You won't be able to get Screenscastify if you try to use Firefox or Internet Explorer.)

2. Click on the "Apps" icon. 


 3.Click on the "Web Store" icon.
 

4. Search for Screencastify, and click the blue "Add to Chrome" button.


5. Follow the instructions from there, allowing Screencastify to access your camera and desktop. 

6. Play around!

What are some benefits of using Sceencastify in the classroom?
The University of Waterloo made this great list of ideas:
  1. You can use screencasts to deliver course content that you, as the instructor, don't want to cover during class. For example, after giving your students a test, you might not want to spend an hour going over the test questions to explain the correct solutions. Instead, you could create a screencast that explained the solutions, which your students could watch (and re-watch) at their convenience. 
  2. You can use screencast to deliver remedial content. For example, the instructor of a history course might find that many of his or her students don't know how to properly reference sources. Instead of covering this remedial content in class, it is delivered via a screencast that is accessed by those students who need it. 
  3. Screencasts allow students to access the content from any location and whenever they need it. They can watch screencasts multiple times. They can review them prior to final examinations. 
  4. Screencasts can benefit students whose first language is not English (they can watch the screencast multiple times, or you can even include captions with your screencast), and for students with certain learning disabilities. 
  5. Screencasts can allow you to deliver content outside of class, so that class time can be spent on more productive and interactive learning activities. This is called flipping the classroom
How have I used Screencastify?
I had a meeting to attend during one of my classes, but I really needed to teach my students how to set up their body paragraphs of their essays. The substitute was not going to be able to teach that, so I realized that I could make a screencast showing my process. I first recorded the screencast, then uploaded it to my Youtube account. Within my Youtube account, I used the "Creator Studio" to crop my video and add pop-up annotations to add extra tidbits of information. This certainly is not an expert screencast, but it give an idea about some of the potential for the tool.

How else could Screencastify be used?
-Record audio over a GoolgeSlides or Microsoft Powerpoint presentation.
-Explain a research process, taking viewers to sites that were/could be visited.
-Realtime video of teacher giving feedback on written work. (This example used Snagit - another screencasting tool - but the premise is the same.) 

How easy is Screencastify to use?
Downloading the extension and recording basic videos is very easy and intuitive (and free!). You just follow the system prompts.  Storing and sharing videos is easy since everything is accessible from the web. However, the free version of Screencastify does not come with many features, even basic cropping, so you must have some willingness and familiarity with YouTube to be able to edit the video in any way. 
 

I'd love to see and hear any other ideas you have for screencasting in your own classroom!
-Brittany R

Glogster

I explored Glogster for today's class. Glogster is virtual poster building website for teachers and students.
 This website is not free!

There is, however, a 7 day free trial which I will try to take full advantage of. Once registered, click on create new glog. From there you may pick pre-planned layout. These layouts have areas for text, pictures, videos, and titles. Since I decided to make a poster on the Diary of Anne Frank, I chose a layout that looked old and worn out. 

From there most of it was easy. In order to add text, you click on a text box and begin typing. You can change the font, the color, the size, etc. There is a black tool bar along the top of your project. 

From this toolbar you can add other things to your glog. Instead of opening a new window to search for videos or images, this step is available in the toolbar. The text feature allows you to add text boxes in all different styles. The graphics features has graphics in all subjects including a graphic of the human heart of anatomy, shapes for geometry, and flags for languages. If what you are looking for is not available in graphics, click image right next to the word graphic. In the image section there are two categories: my images (pictures that are saved on your computer) and google (search for and directly insert images). I used this tool to find images of Anne Frank, concentration camps, Hitler, etc. 

You can also change a few other things from your toolbar as well. You can change your wall from this toolbar. The wall is just the backdrop for your poster. Once again there folders of categories to choose from as well as an option to search google for another image. The toolbar also allows you to add other features. Audio lets you add sound or music, but only things saved on your computer (there is no google or youtube option here). You can add videos either from your personal collection or from youtube. The last tab is reserved for data, which I assume means including charts or excel sheets from your computer. 

Here is Glogster I found on how to use Glogsters:

Most of this website functions like the settings in our blogs. You may change appearance including the background, the text itself, etc. You may add pictures, video, or audio to make it more interesting. Or you can just leave the original format and simply type! For ease of use I give this tool 4 stars.
4-stars.jpg (1000×250)
This website allows teachers with few resources to inspire creativity and interest in any topic. If students chose a layout and stick with it, it is very simple to use. Adding videos and pictures are made easy with the tool bar connected with Google and Youtube. The only problem I encountered was when you change the size of a text box, the font size does not change proportionally. Due to this feature, I often had to re-size the font. However I am sure many students will not encounter this issue.

Livebinders


What is it?

Livebinders is a digital 3-ring binder that allows use to have an organized storage area that is accessible from anywhere.


Why Livebinders?

No more messy storage!


  • You can input documents, webpages, PDFs, images or videos and organize them neatly with tabs. 
  • Livebinders is a great tool for educators and is a cutting edge way to store materials in a paperless fashion.
  • Accessible from any device; there is an iPad app that can be downloaded as well.
  • Can be made public or private and can be shared with anyone that has the link.

What can educators do with it?

As teachers, we keep countless binders, many of them stored away and forgotten about. 

Some examples of ways this tool can be used: 
  • substitute plans
  • staff handbooks made by administration
  • student portfolios
  • professional development
  • teaching tools by subject.

Is it easy to use?

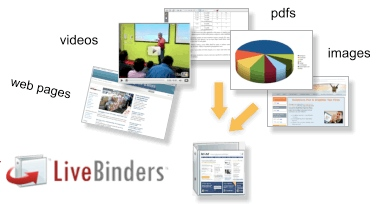
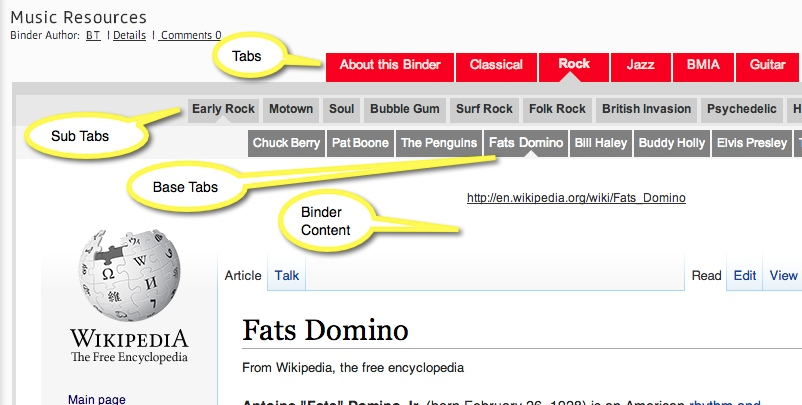
Livebinders is easy to use and is a simple tool for organizing materials and resources. After making an account, it automatically walks the user through the steps to create a new binder. Each user has a binder called "My First Binder" in their dashboard. It gives a video, PDF, and printable version of the steps to create binders. When finished it explains how to delete the tab so this binder can be reused. The options at the top of the website are self explanatory; it is easy to add tabs and subtabs. It also gives many options to upload content by clicking on the "content" button.


There are many tutorials for educators


How much is it?

A version of this is free and includes ten binders, two levels of tabs, and 100 MB of storage. The basic version costs $8 per month but allows for unlimited binders. The company offers a discounted price for educators, although this price was not stated on the website.

I found a great website for teachers to share Livebinders they have created with other educators for use in their classrooms. They are based on grade level and subject area!